Tuesday, May 14, 2013

JDeveloper setup for OAF

Following are some basic steps to be followed to setup JDeveloper for application development using OAF (Oracle Applications Framework).

1. Find out the ATG version of your application. To find ATG version login to the application. Click on About this Page link. Click on Technology Components Tab. Find out the OA Framework version. This is nothing but the ATG version


2. Login to Oracle Support and search for Note How to find the correct version of JDeveloper to use with eBusiness Suite 11i or Release 12.x [ID 416708.1].
This gives the details of ATG versus JDeveloper. Using the patch links download the JDeveloper.


3. Decide the location where you want your OAF projects sitting on your hard drive and set that as the environment variable for JDEV_USER_HOME. For example JDEV_USER_HOME can be set to H:\OAFJdeveloper\jdevhome\jdev\


OAF - Create a simple display page

In this blog, we will create a page to display data from the table


Open the JDeveloper. Here we consider the user to be aware of how to use the JDeveloper. Create a project, configure design time and run time connection parameters.
 
Create Table CONTACTS
Create XX_CONTACTS (CONTACT_ID, FIRST_NAME, LAST_NAME, EMAIL_ADDRESS, MOBILE_PHONE, HOME_PHONE) table using the following script.

CREATE TABLE xx_contacts( contact_id NUMBER
, first_nameVARCHAR2(100)
, last_nameVARCHAR2(100)
, email_addressVARCHAR2(100)
, mobile_phoneVARCHAR2(100)
, home_phoneVARCHAR2(100)
, created_by NUMBER
, creation_date DATE
, last_update_by NUMBER
, last_updated_dateDATE
, last_update_loginNUMBER);

In this table the last five columns, called who columns, are used for auditing purposes and to track the owner of the records in the table.

Create Entity Object

1. Click on project and click on New.

2. Select ADF Business Components in the Business Tier under Categories section > Select Entity Object in the Items secion. Click Ok button.

3. Select APPS for Database Schema, XX_CONTACTS (table created in Create Table section). Provide ContactsEO for the Name of Entity Object, enter oracle.apps.inv.ctc.schema.server for package. Entity Objects are in general created in schema package. Click Next.

4. Accept the defaults in steps 2 to 5. Navigate to Finish page that shows the Attributes. Click Finish on this page.

5. This creates ContactsEO in package oracle.apps.inv.ctc.server.schemapakage

Create View Object
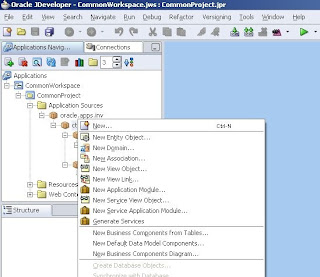
1. Right click on package ctc and click on New

2. Enter oracle.apps.inv.ctc.server for package and ContactsVO for View Object name and click Next

3. On Entity Objects page select ContactsEO from the Available and move to Right by clickin on “>” button.


4. On Attributes page click on “>>” button to select all the available attributes from ContactsEO to ContactsVO.

5. On the following pages accept default values and click next on pages Step 4 to Step 7 to go to Finish page. Click Finish button on this page to create ContactsVO.

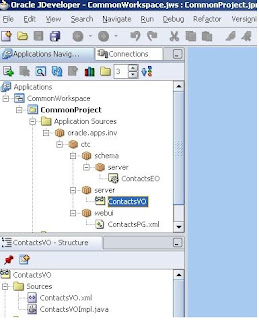
6. These steps create ContactsVO in package oracle.apps.inv.ctc.server

Create Application Module
1. Right click on server and click on New Application Module


2. Enter oracle.apps.inv.ctc.server for package and ContactsAM for Name and click Next


3. On VO selection page select ContactsVO from package oracle.apps.ctc.server and click on “>” button to assicateattacheContactsVO instance to this Application Module. Rename the instance Name to ContactsVO. Click Next.


4. Accept the defaults on Step3 and Step4 pages and click Next button to navigate to Finish page, where we can see ContactsVO instance being attached to this Application Module. Click Finish to complete AM creation.


5. Now the AM is available under oracle.apps.inv.ctc.server package. Select ContactsAM, Now in this AM ContactsVO has to be initialized to get the values from the table. In the Structure panel down there, double click on ContactsAMImpl.java file to edit the code.


6. Edit the ContactsAMImpl.java to add code to initialize ContactsVO as shown in the selected section of below figure.

7. Save the project by clicking on Save all button


Create page ContactsPGalong with a Controller
1. Right click on project and click on New

2. Select OA Components under Web Tier > Select Page under Items. Click on OK button


3. Enter ContactsPG for Name and oracle.apps.inv.ctc.webui for package and click OK to create page ContactsPG under package oracle.apps.inv.ctc.webui.


Once the page is created, in property inspector add AM Definition = oracle.apps.inv.ctc.server.ContactsAM

4. Now select the ContactsPG, select region1 and change the ID of this region on Property Inspector panel on rightside. In this example ContactPG is the ID provided for region1.


5. Rightclick on ContactsPG region, and add new region. Name it as ContactsHdr and change the Region Style to Header.

6. Similarly add a table region under ContactsHdr.

7. Right click on ContactsPG, then click on Set New Controller.

8. Enter oracle.apps.inv.ctc.webui for package and ContactsCO for name and click Ok to create a controller. Once the controller is created, open the controller code and add the code that calls Application Module, which initializes the ContactsVO.

9. Under ContactsTbl table, add additional items to display the contact details.

10. Change the properties of this item to add view instance, view attribute and prompt in the property inspector.

11. Likewise create additional items under the table structure.

Run the page to see contacts.
Right click on ContactPG and click on RUN to see the results.

Final output:


ADF Faces Skinning

Demo: ADF Skinning Editor


This video demonstration shows, how to create a new look and feel for your applications, using the ADF Skinning Editor.

Launch Demonstration

Building an ADF Application - Demo

This video demonstration shows how to develop an Oracle ADF application. In this demonstration, you see how to:

  • Create a new Fusion web application
  • Create ADF Business Components and add validation
  • Create a new JSF page and arrange layout components, such as tabs, on the page
  • Drag and drop data controls onto a page to create data-bound components, such as tables, buttons, and visual components like graphs
  • Create a Java class and expose it as a data control
  • Create an ADF task flow and expose it as a region on a page
  • Run the application and view it in a browser
The below video is from Oracle eLearning Library

Launch Demonstration

Monday, May 13, 2013

Launch Workflow from OAF Page

Using class oracle.apps.fnd.framework.webui.OANavigation provided by Oracle for Workflow API, you can launch workflow directly from OAF Page.  There are two ways to launch workflow :

1.  Oracle PL/SQL API (wf_engine)
2.  Java Wrappers

In this blog, we shall launch a workflow from OAF page.

1.  Create a submit button and name the partial event as "launchWF"
2.  Write below java procedure to invoke workflow

import oracle.apps.fnd.framework.webui.OANavigation;

    public void launchWF(OAPageContext pageContext)
    {
        String PItemType = "XXSALES";
        String PProcess = "SALES_WF";
        String PItemKey = "SALES-001";  // This can be a random item key generated
   
        OANavigation wf = new OANavigation();
   
        // Now create Workflow Process
        wf.createProcess(pageContext, PItemType, PProcess, PItemKey);
   
        // Set Sales Order Number
        wf.setItemAttrText(pageContext, PItemType, PItemKey,"ORDER_NO", "101");
   
        // Start Workflow Process
        wf.startProcess(pageContext, PItemType, PProcess, PItemKey);

    }


3.  Call the above procedure in ProcessFormRequest Method

    public void processFormRequest(OAPageContext pageContext, OAWebBean webBean)
    {
    super.processFormRequest(pageContext, webBean);

    if ("launchWF".equals(pageContext.getParameter(EVENT_PARAM)))
      {
        launchWF(pageContext);
      }
    }


Sunday, May 12, 2013

CREATE Oracle FND User API

The below scripts is for creating FND User using standard oracle API.

-- ****************************************************************
-- Filename -  CreateFndser.sql
-- Purpose  -  Script to create fnd user
-- Module   -  System Administrator
-- ****************************************************************


DECLARE 
   l_user_name               VARCHAR2(100)   := 'TestUser; 
   l_user_password           VARCHAR2(100)   := 'Oracle123'; 
   l_user_start_date         DATE            := TO_DATE('01-JAN-2012'); 
   l_user_end_date           VARCHAR2(100)   := NULL; 
   l_password_date           VARCHAR2(100)   := TO_DATE(''01-JAN-2012'); 
   l_password_lifespan_days  NUMBER          := 70; 
   l_person_id               NUMBER          := 21855; 
   l_email_address            VARCHAR2(100)   := 'TestUser@test.com';


BEGIN 
  
fnd_user_pkg.createuser 
  (  x_user_name                => l_user_name, 
     x_owner                    => NULL, 
     x_unencrypted_password     => l_user_password, 
     x_start_date               => l_user_start_date, 
     x_end_date                 => l_user_end_date, 
     x_password_date            => l_password_date, 
     x_password_lifespan_days   => l_password_lifespan_days, 
     x_employee_id              => l_person_id
 ); 
  
 COMMIT;

EXCEPTION 
       WHEN OTHERS THEN 
           
ROLLBACK; 
           DBMS_OUTPUT.PUT_LINE(SQLERRM); 
END; 
/


OAF - DB Sequence in Entity Object


There are two ways to assign database sequence value in OAF, DB sequence value can be assign to EO or at VO level.

Create sequence in database

CREATE SEQUENCE XX_EMP_SEQ START WITH 1 INCREMENT BY 1;

Assign DB sequence value in EO

Go to your EOImpl.java and write the below code in create constructor

public void create(AttributeList attributeList) {
super.create(attributeList);
OADBTransaction transaction = getOADBTransaction();
Number seqNo = transaction.getSequenceValue("XX_EMP_SEQ");
setFileId(seqNo);
}

Assign DB sequence value in VO

OAViewObject vo = (OAViewObject)findViewObject("XXEmployeesVO");
OARow row = (OARow)vo.first();
row.setAttribute("EmployeeId", getOADBTransaction().getSequenceValue("XX_EMP_SEQ").toString());
 

ADF Security

ADF Security is an authentication and authorization framework in Oracle ADF. This session explains ADF Security from ground up. It starts with container managed security and JAAS to how they to fit into ADF Security. It then explains the ADF Security architecture with Oracle Platform Security Services (OPSS) and the WebLogic security platform for authentication. Topics discussed include authorization, page protection, task flow protection as well as security expressions ADF provides for EL.


Oracle ADFInsider Essentials
 

ADF Task Flow - Overview Part 2

This 75 minute session continues where part 1 ended and completes the sample application that guides viewers through different aspects of unbounded and bounded task flow development. In this recording, memory scopes, save for later, task flow opening in dialogs and remote task flow calls are explained and demonstrated. If you are new to ADF Task Flow, then it is recommended to first watch part 1 of this series to be able to follow the explanation guided by the sample application..


Oracle ADFInsider Essentials

ADF Task Flow - Overview Part 1

This 90 minute recording introduces the concept of ADF unbounded and bounded task flows, as well as other ADF Controller features. The session starts with an overview of unbounded task flows, bounded task flows and the different activities that exist for developers to build complex application flows. Exception handling and the Train navigation model is also covered in this first part of a two part series. By example of developing a sample application, the recording guides viewers through building unbounded and bounded task flows. This session is continued in a second part..


Oracle ADFInsider Essentials

ADF Binding Internals - Accessing Binding at Runtime P2

In the second part of this ADF Insider presentation you will learn about how you access ADF Model bindings at runtime. Understand what is a BindingContext, a BindingContainer and the common methods you will use. Find out how you can use EL and Java to access an AttributeBinding, an OperationBinding and a JUCtrlListBinding.


Oracle ADFInsider Essentials
 

ADF Binding Internals - Intro & metadata files P1

Looking at understanding how the ADF Model layer works? What are data controls? What are bindings? In part 1 of this ADF Insider you will learn about data controls, the binding layer and the various files (e.g. DataBindings.cpx, PageDef.xml) that are used to bind business services to UI controls.


Oracle ADFInsider Essentials

ADF Faces Skinning

Skinning in ADF Faces enables application developers to change the color scheme of an application without changing the application itself. To build a skin, developers use Cascading Style Sheets (CSS) referenced from the trinidad-skins.xml file and configured in the trinidad-config.xml file. The session explains how skinning works, starting from skin selectors and their usage.


Oracle ADFInsider Essentials
 

ADF Page Templates and Declarative Components

Learn how you can build a consistent look and feel to your ADF application pages using page templates and declarative components. In this session you will see how you can use template facets to define content areas in a template, and how attributes can be used to control features of the template such as initial layout. You will also see how you can build reusable composite components.


Thanks to  Oracle ADFInsider Essentials


Introduction to ADF Faces

Oracle ADF Faces offers a set of rich Ajax enabled components that simplify the creation of Web user interfaces. Get an overview of the various components and the built-in capabilities of the Oracle ADF Faces framework.


Oracle ADF Faces Video


Introduction to ADF Business Components

Oracle ADF Business Components offer a simple way to create reusable business services that interact with your relational database. Learn about the architecture and features that are provided by Oracle ADF Business Components.


Oracle ADFInsider Essentials
 

Introduction to ADF

Oracle ADFInsider Essentials

 
Oracle ADF(Application Development Framework) is a constituent part of Fusion middleware and is the technology used for desktop/web development in the Fusion middleware stack.

Fusion middleware is a complete family of application infrastructure products which include an Enterprise application server, tools for Integration- and process-management,Business intelligence,Content management,Identity management,Performance,User interaction and application development tools.

Oracle ADF falls into the application development tools category.It is an end-to-end Java EE framework that simplifies application development by providing out of the box infrastructure services and a visual and declarative development experience.

JDeveloper is the primary integrated development environment and the tool for developing applications based on ADF.

On the technical aspects development with ADF is primarily based on MVC design concepts and there are a variety of tools and frameworks to cater the need.Listed below are technologies that can be used in each layer.

Model

    * EJBs
    * Web Services
    * TopLink
    * Javabeans
    * POJO - simple Java classes (Plain Old Java Objects)
    * ADF Business components
    * Portlets
    * CSV and XML files

View

    * Swing
    * JavaServer Pages (JSP)
    * JavaServer Faces (JSF)
    * ADF Faces

Check the below video


Close or Cancel Workflow Notification

I have written a pl/sql script to cancel or close workflow notifications through wf_notifications API.  The script has 2 parameters (recipient_role, close_type), for e.g. you want to close notifications for specific user then pass parameter of user and type as CLOSE or CANCEL for cancelling notification.

PL/SQL Script

-- ****************************************************************
-- Filename -  WFCloseNotifications.sql
-- Purpose  -  Script of cancel or close workflow notification
-- Module   -  Workflow Administrator
-- ****************************************************************
declare
  -- declare Cursor
  cursor get_notif is select * from wf_notifications where recipient_role='&UserName' and status='OPEN';
  -- Local variables here
  i integer           number(10):=1;
  notification_type   varchar2(10):= '&nType';
begin
 dbms_output.put_line('Executing Procedure');
  -- open cursor to check open notifications which needs to be closed
  for c_get_notif in get_notif
   loop
    begin

    -- Check notificaiton type (close or cancel)
    -- CLOSE  -  This will close information notifications only, all action required notification will not be close
    -- CANCEL -  This will cancel notification, action required notification such as Approve/Reject will be cancelled and cannot be rollback, users will not be able to take actiion on such notification later
    if upper(notification_type)='CLOSE' then
      wf_notification.Close(c_get_notif.notification_id, c_get_notif.recipient_role);
      i:=i+1;
   elsif upper(notification_type)='CANCEL' then
      wf_notification.cancel(c_get_notif.notification_id, c_get_notif.recipient_role);
      i:=i+1;
    end if;
   
    exception
     when others then
      null;
    end;
   end loop;
  
   commit;
   dbms_output.put_line(to_char(i)||' records effected');
   dbms_output.put_line('Procedure Executed Successfully');
end;

Bounce Apache Server - Oracle Apps R12

Bounce Apache Server

After deploying OAF files to application server, you need to restart Apache server to take effect of changes done.  Below are the steps to bounce apache server in R12.

Go to $COMMON_TOP/admin/scripts

1. adapcctl.sh stop                   --        Stop Oracle HTTP Server (OHS) instance
2. adoacorectl.sh stop              --        Stop OPMN managed OACORE OC4J instance

3. adapcctl.sh start                    --       Start Oracle HTTP Server (OHS) instance
4. adoacorectl.sh start               --       Start OPMN managed OACORE OC4J instance

Note:  Any changes in your java code requires restart of apache services.